Network administrators and IT professionals frequently rely on command-line utilities to test server connectivity, diagnose port accessibility, and manage remote network equipment. Knowing how to install telnet windows 10 allows you to enable this essential protocol easily without downloading unverified third-party software.
While Microsoft disables the Telnet client by default in modern operating systems for security reasons, enabling it takes only a few simple steps. In this guide, we will cover four practical methods to install and use Telnet on your PC.
Table of Contents
What Is Telnet and Why Is It Disabled by Default?
Telnet is a network protocol used to communicate with remote servers over port 23. Microsoft disables it out of the box because:
Telnet transmits data in plain unencrypted text, making it vulnerable to packet sniffing.
Modern secure network management relies primarily on SSH (Secure Shell) protocols.
Disabling unused network clients reduces the overall attack surface of Windows 10.
However, Telnet remains an indispensable tool for testing open TCP ports (
telnet <hostname> <port>).
How to Install Telnet Windows 10: 4 Fast Methods
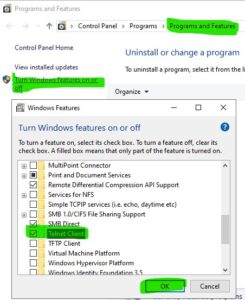
Step 1: Install Telnet via Windows Features Interface
The graphical user interface is the simplest way to turn on optional Windows components:
Press
Win + R, typeappwiz.cpl, and press Enter to open Programs and Features.Click Turn Windows features on or off on the left-side pane.
Scroll down the list until you find Telnet Client.
Check the box next to Telnet Client and click OK.
Windows will search for required files and display a confirmation once installed.
Step 2: Install Telnet via Command Prompt (CMD)
If you prefer using command lines, you can execute a DISM command with administrative rights:
Press
Win + S, typecmd, right-click Command Prompt, and select Run as administrator.Type the following command and press Enter:
dism /online /Enable-Feature /FeatureName:TelnetClientWait for the progress bar to reach 100%. The system will confirm that the operation completed successfully.
Step 3: Install Telnet via PowerShell
PowerShell offers a quick, automated cmdlet to enable optional Windows capabilities:
Right-click the Start Menu icon and select Windows PowerShell (Admin).
Paste the following command into the window and press Enter:
Enable-WindowsOptionalFeature -Online -FeatureName "TelnetClient"If prompted to restart your computer, type
Yand press Enter.
Step 4: Verify Telnet Installation and Test Port Connectivity
Once enabled, verify that the client executes properly from your terminal. If you previously recorded terminal walkthroughs or setup videos, check our guide on how to record screen on windows 10.
Open Command Prompt or PowerShell.
Type
telnetand press Enter. You should see the Welcome to Microsoft Telnet Client prompt.To test a specific web server port, type
telnet google.com 80and press Enter.A blank screen indicates that the remote port is open and accepting TCP connections.
Frequently Asked Questions (FAQs)
Q: Is it safe to install telnet windows 10 on a home network?
A: Yes, learning how to install telnet windows 10 for testing local network ports or server connectivity is safe. However, avoid transmitting sensitive passwords over public networks using Telnet.
Q: How do I exit the Telnet client prompt in Command Prompt?
A: Type q or quit and press Enter to exit the Telnet prompt and return to the standard Windows command line.
Conclusion
Understanding how to install telnet windows 10 via Windows Features, DISM commands, or PowerShell provides an effective tool for troubleshooting network ports. Learning how to install telnet windows 10 ensures you can diagnose remote server connections quickly. For official Windows feature documentation, visit Microsoft.