Capturing images of your computer screen is essential for sharing information, saving online receipts, and creating technical documentation. Learning how to screenshot on windows 10 allows you to capture full-screen displays, selected app windows, or specific screen areas effortlessly without installing third-party software.
In this step-by-step guide, we will break down five fast and practical methods to take and save screenshots on your PC.
Table of Contents
Why Learn How to Screenshot on Windows 10?
Windows 10 provides several native screen capture features built directly into the operating system. Benefits include:
Instantly saving technical error messages to help diagnose system problems.
Capturing snippets of web pages or documents for presentation materials.
Selecting specific screen coordinates rather than cropping large image files later.
Automatically saving images directly to your local Pictures folder without manual copying.
How to Screenshot on Windows 10: 5 Best Methods
Step 1: Use Snipping Tool (Win + Shift + S)
The Snipping Tool shortcut is the most versatile way to capture custom screen selections:
Press
Win + Shift + Son your keyboard simultaneously.The screen will dim, and a small toolbar will appear at the top.
Select your preferred mode: Rectangular, Freeform, Window, or Full-screen.
Drag your cursor over the screen area you want to capture.
Click the pop-up notification at the bottom-right to edit, annotate, or save the image.
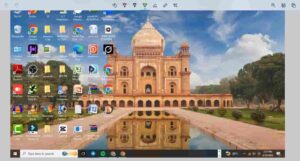
Step 2: Capture Full Screen Automatically (Win + PrtScn)
If you need to capture and save the entire screen instantly without opening an editor:
Press the
Win + PrtScn(Print Screen) keys together.The screen will briefly flash or dim, indicating a capture was taken.
Open File Explorer (
Win + E) and navigate toPictures > Screenshots.Your captured full-screen image will be automatically saved in PNG format.
Step 3: Copy Screen to Clipboard (PrtScn Key)
To quickly paste a screenshot into an email, document, or messaging app:
Press the PrtScn key on your keyboard.
The full-screen image is saved directly to your system clipboard.
Open your document or image editor (such as Microsoft Paint).
Press
Ctrl + Vto paste the image, then save it manually.
Step 4: Capture an Active Window (Alt + PrtScn)
When you only want to record a single open application window without capturing your taskbar:
Click on the specific window or application you wish to capture to make it active.
Press
Alt + PrtScnon your keyboard.Open an image editor or document, then press
Ctrl + Vto paste the window capture.
Step 5: Capture Screenshots using Xbox Game Bar
Windows 10 includes a dedicated gaming bar that works great for taking screenshots in full-screen games or software:
Press
Win + Gto launch the Xbox Game Bar.Click the Capture widget icon (camera icon) in the top menu.
Click Take screenshot (or press
Win + Alt + PrtScn).If you ever need to perform core system recovery before capturing images, review our guide on how to factory reset windows 10.
Frequently Asked Questions (FAQs)
Q: Where are screenshots saved on Windows 10?
A: When learning how to screenshot on windows 10 using Win + PrtScn, images save automatically to C:\Users\[Username]\Pictures\Screenshots. Standard PrtScn captures stay on your clipboard until pasted.
Q: Why is my Print Screen key not working?
A: Check if your keyboard has an Fn key. On many laptops, you must press Fn + PrtScn or Fn + Win + PrtScn to activate the screen capture function properly.
Conclusion
Mastering how to screenshot on windows 10 using built-in keyboard shortcuts and software utilities makes capturing screen data quick and easy. Knowing how to screenshot on windows 10 ensures you can save important documents and share information efficiently. For official keyboard shortcut guides, visit Microsoft.