Experiencing unexpected frame drops, slow texture loading, or system stuttering can ruin your favorite gaming moments. Learning how to speed up windows 10 for gaming helps you reallocate processing power, remove unneeded operating system overhead, and deliver maximum frame rates to your games.
In this performance optimization guide, we will break down the primary causes of system bottlenecks and show you six proven methods to boost PC speed.
Table of Contents
Why Speed Up Windows 10 for Gaming?
System background services consume hardware resources that your graphics card and processor need during heavy gaming:
-
Higher and Stable FPS: Keeps frame rates consistent during intense in-game action.
-
Reduces Input Latency: Decreases execution delays between controls and screen refresh cycles.
-
Frees Up System RAM: Stops background software from stealing valuable memory headroom.
-
Lower Operating Temperatures: Keeps hardware execution loads optimized to prevent thermal throttling.
How to Speed Up Windows 10 for Gaming: 6 Ultimate Tweaks
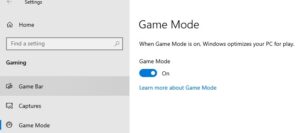
Step 1: Enable Game Mode and Graphics Optimization
Windows 10 includes dedicated features designed specifically to prioritize system resources for games:
-
Press
Win + Ito open Settings and select Gaming. -
Click Game Mode from the left menu and toggle it to On.
-
Next, navigate to System > Display > Graphics settings.
-
Enable Hardware-accelerated GPU scheduling and restart your PC.
Step 2: Configure the High Performance Power Plan
By default, Windows balances power usage, which can throttle your hardware performance:
-
Press
Win + R, typepowercfg.cpl, and hit Enter. -
Expand Hide additional plans (if necessary).
-
Select High Performance or Ultimate Performance.
Step 3: Disable Unnecessary Startup Programs
Prevent background applications from launching automatically when your system boots up:
-
Press
Ctrl + Shift + Escto launch Task Manager. -
Switch to the Startup tab.
-
Right-click background apps with high resource impact (like launchers or updater tools) and click Disable.
Step 4: Clear Temporary Cache and Standby RAM
System clutter and residual cache can slow down drive read/write speeds. If you haven’t cleared your physical memory cache yet, check our guide on how to clear ram on windows 10.
-
Press
Win + R, typecleanmgr, and press Enter to open Disk Cleanup. -
Select your main OS drive and click Clean up system files.
-
Select temporary system files and click OK to remove them.
Step 5: Disable Windows Visual Effects
Turning off desktop animations releases system memory back to your active video games:
-
Press
Win + R, typesysdm.cpl, and hit Enter. -
Go to the Advanced tab and click Settings under Performance.
-
Choose Adjust for best performance, click Apply, and then OK.
Step 6: Update Graphics Card Drivers
Outdated drivers can cause crashes, texture glitches, and lower FPS:
-
Open your graphics management software (NVIDIA GeForce Experience or AMD Software).
-
Check for the latest Game Ready Drivers.
-
Perform a clean driver installation to ensure maximum stability.
Frequently Asked Questions (FAQs)
Q: Does learning how to speed up windows 10 for gaming improve FPS?
A: Yes, optimizing your system can improve frame rate stability and increase average FPS by 5% to 15%, depending on how heavily your PC was cluttered before optimization.
Q: Is it safe to disable background services for gaming?
A: Yes, turning off non-essential startup apps and background tasks using native Windows settings is completely safe and fully reversible.
Conclusion
Knowing how to speed up windows 10 for gaming gives you a responsive, high-performance PC setup. Learning how to speed up windows 10 for gaming ensures your games run smoothly without unexpected lag or frame drops. For official system tuning guides, visit Microsoft.