Getting trapped in a continuous startup repair cycle prevents access to your desktop and personal files. When a **windows 10 automatic repair loop** error strikes, the operating system detects boot configuration errors but fails to resolve them automatically, repeatedly rebooting into the same diagnostic menu.
In this step-by-step guide, we will analyze the primary triggers for startup repair failures and walk you through five effective repair methods to restore normal boot sequence.
—
## Table of Contents
* [Understanding the Automatic Repair Loop Error](#understanding)
* [Common Causes of Boot Repair Loops](#causes)
* [How to Fix Windows 10 Automatic Repair Loop: 5 Easy Steps](#solutions)
* [Frequently Asked Questions (FAQs)](#faq)
* [Conclusion](#conclusion)
—
## Understanding the Automatic Repair Loop Error
The Automatic Repair feature is an integrated Windows diagnostic tool designed to fix startup environment issues. When system files, boot sectors, or registry hives become corrupted, Windows automatically launches this recovery environment during bootup.
Under standard conditions, the tool repairs damaged system files within minutes. However, if core system registries or Master Boot Record (MBR) structures suffer severe corruption, the diagnostic tool gets stuck in an infinite loop, constantly refreshing without booting into Windows.
—
## Common Causes of Boot Repair Loops
Pinpointing boot failure triggers simplifies selecting the right repair strategy:
* **Corrupted Boot Configuration Data (BCD):** Damaged bootloader files failing to locate OS startup paths.
* **Registry Hive Corruption:** Damaged Windows system registry hives blocking user account initialization.
* **System File Degradation:** Abrupt system shutdowns or failed updates corrupting essential operating system binaries.
—
## How to Fix Windows 10 Automatic Repair Loop: 5 Easy Steps
Follow these tested recovery commands in the Windows Advanced Startup Options menu to break the boot loop.
### Step 1: Rebuild Boot Configuration Data (BCD) via Command Prompt
Rebuilding corrupted bootloader files is the most reliable way to resolve startup loops:
1. On the Automatic Repair screen, select **Advanced options > Troubleshoot > Advanced options > Command Prompt**.
2. Type `bootrec /fixmbr` and press **Enter**.
3. Type `bootrec /fixboot` and press **Enter**.
4. Type `bootrec /rebuildbcd` and press **Enter**.
5. Close the Command Prompt window and restart your PC. Rebuilding corrupted bootloader files is the most reliable way to fix windows 10 automatic repair loop errors on startup.
### Step 2: Run SFC and CHKDSK Scans
Scanning system files and hard drive sectors repairs broken operating system dependencies:
1. Access **Command Prompt** from the **Advanced options** menu.
2. Type `sfc /scannow /offbootdir=c:\ /offwindir=c:\windows` and press **Enter**.
3. Once completed, type `chkdsk C: /f /r` and press **Enter** to scan the primary system drive.
4. Restart your system after the disk verification process finishes.
### Step 3: Disable Automatic Startup Repair
Temporarily bypassing the automatic repair trigger allows Windows to attempt normal booting:
1. Open **Command Prompt** from Advanced options.
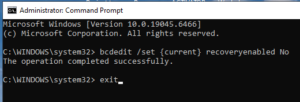
2. Type `bcdedit /set {current} recoveryenabled No` and press **Enter**.
3. Type `exit` and select **Continue to Windows 10**.
Step 4: Restore Windows Registry Hives
Replacing corrupted registry files with clean system backups restores system configuration:
1. Launch **Command Prompt** from the recovery menu.
2. Navigate to your backup folder by typing `copy c:\windows\system32\config\RegBack\* c:\windows\system32\config\` and press **Enter**.
3. Type **A** to overwrite existing files, then exit and reboot.
### Step 5: Perform a System Restore or Reset
If command line repairs fail, restoring your OS to an earlier working state resolves deep configuration conflicts:
1. From the Automatic Repair menu, select **Troubleshoot > Advanced Options > System Restore**.
2. Choose a recently created restore point prior to the boot loop issue and click **Next**.
3. Follow the wizard to complete the system restoration process. If command line repairs fail to resolve the windows 10 automatic repair loop, restoring your OS to an earlier working state resolves deep configuration conflicts.
—
## Frequently Asked Questions (FAQs)
### FAQ 1: Why does my PC keep restarting into Automatic Repair?
*Ans:* This occurs when Windows detects damaged boot configuration files or corrupted system registries that prevent the operating system from completing its boot sequence properly.
### FAQ 2: Will fixing the boot loop delete my personal files?
*Ans:* Command line repairs like rebuilding BCD or running SFC scans do not delete personal files. Performing a complete factory reset, however, may erase local drive data if not backed up.
### FAQ 3: How do I re-enable Automatic Repair later?
*Ans:* To re-enable the automatic diagnostic tool, open Command Prompt as Administrator in Windows and type `bcdedit /set {current} recovery enabled Yes`.
—
## Conclusion
Resolving a **windows 10 automatic repair loop** involves rebuilding boot configuration data, repairing disk sectors, and restoring registry hives. Following these command line procedures restores full system access without needing a full OS reinstallation.
**Pro Tip:** For official system recovery media creation tools and boot diagnostics, visit the official [Microsoft](https://www.microsoft.com) support portal.