When your Windows computer refuses to boot, gets stuck in an automatic repair loop, or experiences a severe system crash, traditional troubleshooting inside the desktop becomes impossible. Having an emergency rescue drive is essential, and knowing how to create a Windows repair bootable USB for free can save your system from total disaster.
In this step-by-step guide, we will walk you through creating a bootable USB recovery drive to fix startup failures, restore system images, and troubleshoot Windows 10/11 errors.
Table of Contents
What is a Windows Repair Bootable USB?
Before building your recovery drive, understanding its purpose helps:
Pre-Boot Environment Access: Allows you to access Advanced Startup options, Command Prompt, and System Restore without booting into Windows.
Emergency Recovery Tool: Helps repair damaged boot loaders, missing system files, and stubborn startup crashes.
Free and Official: Can be generated directly using Microsoft’s native tools using any blank USB flash drive.
Requirements Before You Begin
To ensure a smooth creation process, gather the following:
A Blank USB Flash Drive: At least 8GB of storage space (all existing data on the drive will be permanently erased).
A Working Windows PC: To download the media creation tool and format the USB drive.
Stable Internet Connection: For downloading official Windows installation or recovery files.
How to Create a Windows Repair Bootable USB: Step-by-Step
Method 1: Use the Official Windows Media Creation Tool
The safest and most reliable way to create a bootable repair drive is through Microsoft’s utility:
Go to the official Microsoft website and download the Windows Media Creation Tool for Windows 10 or 11.
Plug your 8GB (or larger) USB flash drive into your computer.
Open the downloaded tool, accept the license terms, and select “Create installation media (USB flash drive, DVD, or ISO file) for another PC”.
Choose your preferred language, architecture, and edition, then select USB flash drive and click Next to finish the download and flash process.
- If you’re also experiencing other Windows 10 or 11 Activation Problems, check our guide Windows PowerShell Troubleshooting.
Method 2: Use Built-In “Recovery Drive” Creator
If you want a recovery drive specifically tied to your current system version:
Press
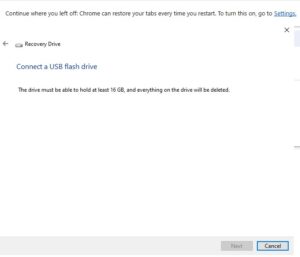
Win + S, type Recovery Drive, and open the tool.Check the box that says “Back up system files to the recovery drive” and click Next.
Select your connected USB drive and follow the prompts to copy the recovery partition files.
Frequently Asked Questions (FAQs)
Q: Will creating a bootable USB delete my personal files?
A: It will delete all data stored on the USB flash drive itself, but it will not affect any files on your computer’s internal hard drives.
Q: Can I use this USB to fix both Windows 10 and Windows 11?
A: It is recommended to create the bootable repair drive using the specific version of Windows (10 or 11) that matches the operating system installed on the target computer.
Conclusion
Encountering a computer that fails to boot can be stressful, but knowing how to create a Windows repair bootable USB ensures you always have an emergency safety net. Having a reliable recovery USB on hand ensures that no matter what kind of sudden boot failure or crash your computer encounters, you can safely restore functionality and protect your personal files without permanent data loss. By keeping a recovery drive handy, you can fix system crashes and restore your PC in minutes. For additional support, visit Microsoft Support.
“” Alawa’s keep your bootable drive stored safely so it is Ready whenever an unexpected emergency Strikes.”