When your operating system encounters persistent software conflicts, malware infections, or driver instability, booting into a diagnostic environment becomes necessary. Entering windows 10 safe mode starts the system with a minimal set of essential files and drivers, allowing you to troubleshoot and fix core OS issues effectively.
In this step-by-step guide, we will break down why safe mode is critical for system maintenance and walk you through five fast methods to access it.
Table of Contents
What Is Windows 10 Safe Mode?
Safe Mode is an isolated execution state designed to help diagnose operating system stability issues. Key advantages include:
Loading only essential system dependencies and display drivers.
Preventing third-party startup applications from executing automatically.
Isolating driver crashes, corrupt system updates, or malware activity.
Allowing safe removal of stubborn software or system restore operations.
How to Boot Windows 10 Safe Mode: 5 Fast Methods
Step 1: Use System Configuration (MSConfig)
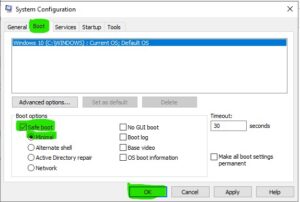
The System Configuration tool is the easiest way to force Windows to boot into safe mode on your next restart:
Press
Win + R, typemsconfig, and press Enter.Select the Boot tab at the top of the window.
Under Boot options, check the Safe boot box.
Select Minimal for standard safe mode or Network if you need internet access.
Click Apply > OK, then select Restart.
Step 2: Access Safe Mode via Shift + Restart
You can quickly trigger the Advanced Startup menu directly from the Windows Start menu or sign-in screen:
Click the Start Menu and open the Power options.
Hold down the Shift key on your keyboard and click Restart.
When the blue options menu appears, select Troubleshoot > Advanced options > Startup Settings.
Click the Restart button.
After rebooting, press 4 or F4 on your keyboard to enable Safe Mode.
Step 3: Boot into Safe Mode via Windows Settings
If you prefer navigating through the standard graphical interface, use the Settings panel:
Press
Win + Ito open Settings and select Update & Security.Click Recovery on the left menu.
Under Advanced startup, click Restart now.
Choose Troubleshoot > Advanced options > Startup Settings > Restart.
Press 4 to select Safe Mode once the options list displays.
Step 4: Force Safe Mode using Command Prompt
Command line execution allows you to configure your next boot sequence directly:
Press the Windows key, type
cmd, right-click Command Prompt, and select Run as administrator.Type
bcdedit /set {current} safeboot minimaland press Enter.Close Command Prompt and restart your PC to launch directly into safe mode.
To reverse this later in Command Prompt, run
bcdedit /deletevalue {current} safeboot.
Step 5: Run Diagnostic SFC Scans in Safe Mode
Once in safe mode, you can safely repair corrupted system files without background software interfering. If you previously experienced severe system crashes, check our guide on windows 10 system restore.
While in Safe Mode, press
Win + S, typecmd, and run Command Prompt as administrator.Type
sfc /scannowand press Enter.Allow the repair scan to reach 100% completion before restarting back into standard Windows.
Frequently Asked Questions (FAQs)
How do I exit safe mode on Windows 10?
Open msconfig (Win + R), go to the Boot tab, uncheck the Safe boot box, click Apply > OK, and restart your computer normally.
What is the difference between Safe Mode and Safe Mode with Networking?
Standard Safe Mode loads basic drivers without network access. Safe Mode with Networking loads additional network drivers, allowing you to access the internet and local network resources.
Conclusion
Knowing how to access windows 10 safe mode using MSConfig, Advanced Startup, or Command Prompt provides a reliable safety net for diagnosing system crashes and driver conflicts. Using these isolated startup methods ensures quick and effective troubleshooting. For official Microsoft recovery documentation, visit Microsoft.