A non-responsive microphone can halt your online meetings, gaming sessions, or voice recordings completely. When experiencing the windows 10 microphone not working bug, privacy restrictions, outdated audio drivers, or incorrect default input settings are usually the primary causes.
In this step-by-step guide, we will break down the common reasons for input audio failures and walk you through five practical fixes to restore your mic’s functionality.
Table of Contents
Why Is Your Microphone Not Working?
Microphone detection failures occur due to software blockages or configuration mismatches. The most common triggers include:
Microphone privacy settings blocking app access.
Outdated or corrupted Realtek audio drivers.
The microphone being disabled in the Control Panel Sound settings.
Incorrect default input device selected in Windows.
How to Fix Windows 10 Microphone Not Working: 5 Easy Steps
Step 1: Check Microphone Privacy Settings
Windows 10 includes privacy switches that block apps from accessing your audio input hardware:
Press
Win + Ito open Settings and click on Privacy.Select Microphone from the left sidebar under App permissions.
Ensure Microphone access for this device is turned On.
Toggle on Allow apps to access your microphone and verify your specific applications (like Zoom, Teams, or Web Browsers) have permission enabled.
Step 2: Set Your Default Input Device
If multiple audio devices are connected, Windows might be routing sound through a muted or disconnected channel:
Right-click the Speaker icon on the system tray (bottom right) and select Sounds.
Go to the Recording tab.
Right-click your active microphone and select Set as Default Device and Set as Default Communication Device.
Double-click the microphone, go to the Levels tab, and ensure the volume slider is above 80% and not muted.
Step 3: Run the Windows Audio Troubleshooter
Windows comes with a built-in diagnostic tool to repair background audio glitches:
Open Settings (
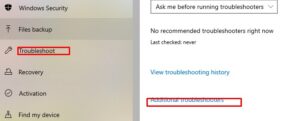
Win + I) and select Update & Security.Click Troubleshoot on the left menu, then click Additional troubleshooters.
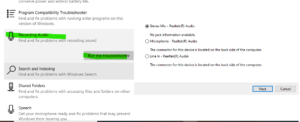
Select Recording Audio and click Run the troubleshooter.
Follow the on-screen prompts to automatically apply suggested repairs.
Step 4: Reinstall or Update Audio Drivers
Corrupted Realtek or generic audio drivers will prevent Windows from detecting your hardware input. If you also experienced hardware detection issues earlier, see our guide on windows 10 Bluetooth missing from device manager.
Press
Win + Xand select Device Manager.Expand the Audio inputs and outputs category.
Right-click your microphone device and select Update driver.
Choose Search automatically for drivers. If the issue persists, right-click the device, select Uninstall device, and restart your PC to allow Windows to reinstall it automatically.
Step 5: Restart the Windows Audio Service
Background audio services control hardware communication:
Press
Win + R, typeservices.msc, and press Enter.Scroll down and locate Windows Audio.
Right-click it and select Restart.
Ensure its Startup type is set to Automatic.
Frequently Asked Questions (FAQs)
Why is my internal microphone not picked up by Windows 10?
Ans: This usually happens if privacy access is disabled in Windows Settings or if the audio device is disabled in the Control Panel Recording tab.
Will reinstalling audio drivers delete my personal files?
Ans: No, updating or reinstalling system hardware drivers only affects device configurations and will not impact your personal documents or data.
Conclusion
Resolving the windows 10 microphone not working issue involves checking privacy settings, selecting default input channels, and updating drivers. Following these steps will restore crystal-clear audio input for all your applications. If the issue persists after updating drivers, consider testing an external USB microphone to rule out physical hardware damage. For official documentation on audio troubleshooting, visit Microsoft.