Multitasking efficiently requires organizing multiple active applications on a single monitor. Utilizing the split screen windows 10 feature allows you to view documents, browser tabs, and applications side-by-side without manually resizing windows.
In this step-by-step guide, we will cover five practical methods to enable and customize split screen layouts on Windows 10 using built-in Snap Assist tools.
Table of Contents
Why Use Split Screen on Windows 10?
Organizing your open applications into structured display grids provides several workflow advantages:
Eliminates constant switching between background tasks via
Alt + Tab.Allows seamless cross-referencing between research documents and spreadsheets.
Maximizes screen real estate on high-resolution or ultrawide monitors.
Dynamically resizes application windows with precise window border ratios.
How to Split Screen Windows 10: 5 Fast Methods
Step 1: Drag and Drop via Snap Assist
The standard drag method snaps open windows directly into equal side-by-side halves:
Click and hold the Title Bar of any open application window.
Drag the window all the way to the left or right edge of your display until a translucent outline appears.
Release the mouse button to snap the window into place.
Select a second open application from the thumbnail grid that appears on the opposite side.
Step 2: Use Windows Keyboard Shortcuts
Keyboard shortcuts offer the fastest way to arrange windows across your screen:
Click on the active application window you want to move.
Press
Win + Left Arrowto snap the window to the left half of the display.Press
Win + Right Arrowto snap it to the right half.Press
Win + Up ArroworWin + Down Arrowto move windows into top or bottom corners.
Step 3: Split Screen into 4 Quadrants
For large displays, Windows 10 supports snapping up to four application windows simultaneously:
Drag an open window into any of the four corners of your screen until the quarter-screen overlay appears.
Release the window to lock it into one quadrant.
Repeat the process for the remaining three corners to view four apps at once.
Step 4: Verify Multitasking Snap Settings
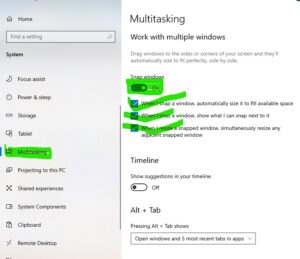
If windows fail to snap or display thumbnail previews automatically, check your multitasking configurations. If you faced critical system stop errors previously, check our guide on windows 10 blue screen of death.
Open Settings (
Win + I) and select System.Click Multitasking on the left menu.
Ensure the main toggle under Snap windows is switched On.
Check all sub-boxes to enable automatic window resizing and thumbnail choices.
Step 5: Adjust Split Screen Window Sizes
You can easily adjust the width ratio between two side-by-side snapped windows:
Position two windows side-by-side using any snap method. split screen windows 10.
Hover your mouse cursor over the dividing line separating the two windows until a double-headed arrow appears.
Click and drag the line left or right to resize both windows simultaneously.
Frequently Asked Questions (FAQs)
Why is split screen not working on Windows 10?
If windows are not snapping, go to Settings > System > Multitasking and make sure the Snap windows feature is turned On.
Can I split screen across multiple monitors in Windows 10?
Yes, Snap Assist works across multi-monitor setups. You can snap windows to the outer edges of each individual monitor screen.
Conclusion
Mastering the split screen windows 10 feature using Snap Assist and keyboard shortcuts dramatically increases productivity. Whether working on two documents or managing four app quadrants, these built-in tools keep your desktop organized. For official feature documentation, Using these simple shortcuts ensures smooth daily multitasking without slowing down your active desktop performance. visit Microsoft.