Capturing a quick display image on your PC screen is essential whether you are saving an important work document, recording a software error, or sharing a visual guide with friends. Knowing **how to screen dump on windows 10** enables you to capture your entire desktop or specific window active region seamlessly.
In this practical troubleshooting guide, we will explore five efficient techniques on how to screen dump on windows 10 using simple built-in utilities and hotkeys.
—
## Table of Contents
* [Why Master Windows Screen Capture Techniques?](#benefits)
* [How to Screen Dump on Windows 10: 5 Fast & Easy Ways](#methods)
* [Frequently Asked Questions (FAQs)](#faq)
* [Conclusion](#conclusion)
—
## Why Master Windows Screen Capture Techniques?
Taking desktop screen dumps offers several distinct productivity advantages:
* **Instant Visual Documentation:** Easily archive display glitches or software setting confirmations.
* **Streamlined Work Communication:** Share step-by-step instructions clearly with team members.
* **No Extra Software Required:** Native keyboard shortcuts execute full or regional screen captures instantly.
—
## How to Screen Dump on Windows 10: 5 Fast & Easy Ways
Follow these straightforward steps to capture and export your active display.
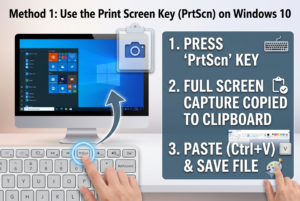
### Method 1: Use the Print Screen Key (PrtScn)
The traditional method on **how to screen dump on windows 10** relies on the primary screen capture keyboard button:
1. Press the **PrtScn** (or **Print Screen**) key on your keyboard.
2. This copies an image of your full active display to your clipboard memory.
3. Open **Paint**, Word, or any graphics app, press **Ctrl + V** to paste the image, and save your file.
Method 2: Save Directly with Windows Key + PrtScn
To bypass copying to the clipboard and save the image file instantly:
1. Press **Windows Key + PrtScn** simultaneously.
2. Your desktop monitor will dim briefly to confirm the screen capture action.
3. Navigate to **File Explorer > Pictures > Screenshots** to access your saved PNG image.
### Method 3: Capture the Active Window via Alt + PrtScn
When you only want to record an active software window instead of the full desktop layout:
1. Click on the specific application window you wish to capture.
2. Press **Alt + PrtScn**.
3. Paste the captured image into Paint or an email document using **Ctrl + V**.
### Method 4: Use the Snipping Tool / Snip & Sketch App
1. Press **Windows Key + Shift + S** on your keyboard.
2. A semi-transparent overlay menu will appear at the top of your screen.
3. Choose rectangular, freeform, window, or full-screen snip modes.
4. Drag your mouse cursor over the desired screen area. The captured clip will open in the notification area for immediate editing and saving.
### Method 5: Capture Gameplay Screen Dumps using Xbox Game Bar
1. Press **Windows Key + G** to open the built-in Xbox Game Bar menu.
2. Click the **Capture** icon (camera symbol) in the top widget panel.
3. Alternatively, press **Windows Key + Alt + PrtScn** to automatically save a gaming screen dump to your Videos > Captures directory.
—
## Frequently Asked Questions (FAQs)
### FAQ 1: Where are screen dump images saved in Windows 10?
*Ans:* If you use **Windows Key + PrtScn**, images save directly in the `Pictures > Screenshots` folder. If you use **PrtScn** alone, the capture stays on your clipboard until pasted manually.
### FAQ 2: Why is my Print Screen key not working?
*Ans:* On laptop keyboards, you may need to hold down the **Fn** key alongside **PrtScn** (e.g., **Fn + PrtScn**) to trigger the screen capture command.
—
## Conclusion
Understanding **how to screen dump on windows 10** simplifies sharing visual content and preserving software error logs. Utilizing keyboard hotkeys or the native Snip & Sketch application ensures quick screen capturing without relying on third-party tools.
**Pro Tip:** For official Windows OS hotkey documentation and diagnostic guides, visit the official [Microsoft](https://www.microsoft.com) support knowledge base.