Stuck Windows download queues, failed install codes, or corrupted system update files can cause unexpected operating system errors and waste valuable disk space. Learning how to clear update cache windows 10 helps you remove broken download packages, reset the Windows Update service, and restore smooth automatic background updates.
In this step-by-step troubleshooting guide, we will cover why clearing update cache is necessary and walk you through four fast methods to clear cached update files.
Table of Contents
Why Clear Windows Update Cache?
Deleting pending or corrupted update installation files provides key performance and stability benefits:
Fixes Stuck Download Loops: Resolves update installations stuck at 0% or 99% progress bars.
Frees Up Storage Space: Reclaims gigabytes of temporary disk space from your main
C:drive.Resolves Installation Errors: Clears corrupted installation packages that trigger blue screen errors or rollback loops.
Restores System Performance: Prevents background update services from consuming high CPU and RAM usage.
How to Clear Update Cache Windows 10: 4 Easy Steps
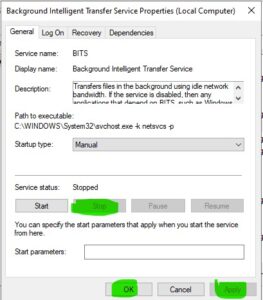
Step 1: Stop Windows Update Services
Before deleting cached update files, you must stop the background update services temporarily:
Press
Win + R, typeservices.msc, and press Enter.Scroll down to locate Windows Update.
Right-click Windows Update and select Stop.
Locate Background Intelligent Transfer Service (BITS), right-click it, and select Stop.
Step 2: Delete Files in the Software Distribution Folder
The Software Distribution folder stores temporary download packages used by Windows Update:
Press
Win + R, typeC:\Windows\SoftwareDistribution\Download, and hit Enter.Select all files and folders inside using
Ctrl + A.Press
Delete(orShift + Delete) to permanently remove all cached update installation packages.If prompted for admin permission, click Continue.
Step 3: Clear Delivery Optimization Files via Disk Cleanup
Windows 10 also caches peer-to-peer update files using Delivery Optimization:
Press
Win + R, typecleanmgr, and hit Enter to open Disk Cleanup.Select your main OS drive (
C:) and click OK.Click the Clean up system files button.
Check the box next to Delivery Optimization Files (and Windows Update Cleanup if available).
Click OK > Delete Files.
Step 4: Restart Windows Update Services
Once the cache files are deleted, restart your update services to resume normal operations:
Return to the Services window (
services.msc).Right-click Windows Update and select Start.
Right-click Background Intelligent Transfer Service (BITS) and select Start.
Go to Settings (
Win + I) > Update & Security and click Check for updates. If you need to check Wi-Fi connection issues during downloads, read our previous guide on how to find wifi password on windows 10.
Frequently Asked Questions (FAQs)
Q: Is learning how to clear update cache windows 10 safe for my PC?
A: Yes, learning how to clear update cache windows 10 is completely safe. The Software Distribution folder only holds temporary installation files, and Windows will automatically re-download clean packages if needed.
Q: Will clearing update cache delete my personal files?
A: No, clearing the update cache only removes temporary Windows update installation data and will not alter your personal documents, photos, or desktop files.
Conclusion
Mastering how to clear update cache windows 10 keeps your operating system running smoothly without update errors. Learning how to clear update cache windows 10 ensures your computer stays secure and up to date effortlessly. For official Windows Update documentation, visit Microsoft.