
Over time, your computer accumulates temporary system files, update installer caches, and browser web data. Learning how to clear cache windows 10 helps free up valuable disk storage space, reduces system slowdowns, and resolves unexpected software glitches.
In this step-by-step guide, we will break down why temporary cache files accumulate and walk you through five quick methods to clean your PC.
Table of Contents
Why Should You Clear Windows 10 System Cache?
System cache stores temporary data to accelerate application loading times. However, outdated or corrupted cache files can lead to performance bottlenecks:
Consuming gigabytes of storage space on your primary hard drive or SSD.
Causing application launch failures due to outdated cached configurations.
Slowing down overall desktop responsiveness and file searching.
Preventing Windows Updates from downloading and installing properly.
How to Clear Cache Windows 10: 5 Best Methods
Step 1: Use Disk Cleanup Tool
The built-in Disk Cleanup utility safely removes system installation files and temporary data:
Press
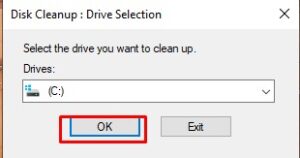
Win + S, typeDisk Cleanup, and press Enter.Select your primary drive (usually C:) and click OK.
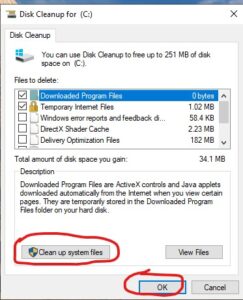
Click Clean up system files to re-scan with administrative privileges.
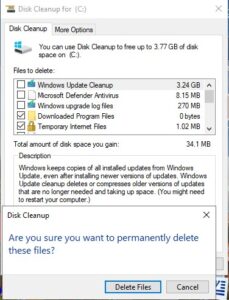
Check the boxes for Temporary files, Thumbnails, and Delivery Optimization Files.
Click OK and select Delete Files to confirm.
Step 2: Clear Temporary Files via Storage Sense
Storage Sense automates the cleanup process directly inside Windows Settings:
Press
Win + Ito open Settings and select System.Click Storage on the left menu.
Toggle the Storage Sense switch to On.
Click Temporary files, select the cached items you want to remove, and click Remove files.
Step 3: Clear Windows Store Cache
If the Microsoft Store fails to download or update applications, resetting its cache restores connectivity:
Press
Win + Ron your keyboard to open the Run dialog box.Type
wsreset.exeand press Enter.A blank Command Prompt window will appear briefly while clearing the cache.
Once completed, the Microsoft Store app will open automatically.
Step 4: Flush DNS Cache via Command Prompt
Clearing your network DNS cache fixes web browsing connection issues and invalid website redirects. If you faced operating system boot errors previously, check our guide on when will windows 10 support end.
Press the Windows key, type
cmd, right-click Command Prompt, and select Run as administrator.Type
ipconfig /flushdnsand press Enter.Confirm that the message Successfully flushed the DNS Resolver Cache displays.
Step 5: Delete Location and File Explorer History
Removing File Explorer search history and system location logs frees up background memory:
Open File Explorer (
Win + E).Click the View tab at the top menu and select Options.
Under the General tab, navigate to the Privacy section at the bottom.
Click Clear next to Clear File Explorer history and press OK.
Frequently Asked Questions (FAQs)
Will clearing system cache delete my personal files?
No, clearing temporary system cache only removes disposable background data, temporary Internet files, and log files. Your personal photos, documents, and programs will remain intact.
How often should I clear cache on Windows 10?
Clearing cache once a month or enabling Storage Sense is recommended to keep your storage drive optimized and prevent performance slowdowns.
Conclusion
Knowing how to clear cache windows 10 using Disk Cleanup, Storage Sense, and Command Prompt keeps your system running fast and clutter-free. Deleting temporary system files regularly optimizes disk drive space and speeds up software execution without compromising system safety. Regularly removing temporary files ensures optimal performance and frees up storage space. For official system maintenance recommendations, visit Microsoft.