


If you want to fix windows 11 memory leak high ram usage, encountering sudden system slowdowns, sluggish application switching, or out-of-memory warnings during intense multitasking can severely disrupt your daily workflow. If you have been searching for an effective method to fix windows 11 memory leak high ram usage, you are in the right place. This frustrating performance issue typically occurs due to faulty non-paged pool allocations, unoptimized background startup services, or outdated graphics and network drivers.
In this comprehensive guide, we will walk you through the top troubleshooting steps to resolve memory leak issues on your Windows 11 computer and restore optimal RAM performance.
Table of Contents
What Causes Windows 11 Memory Leak and High RAM Usage?
Before applying the fixes, understanding why this happens helps:
Faulty Driver Allocations: Network drivers (like Killer Ethernet) or GPU drivers failing to release assigned memory blocks.
Aggressive Background Startup Apps: Unnecessary software launching automatically and consuming valuable system memory resources.
Superfetch/SysMain Service Issues: Windows preloading routines locking up physical memory caches incorrectly.
Top Methods to Fix Windows 11 Memory Leak High RAM Usage
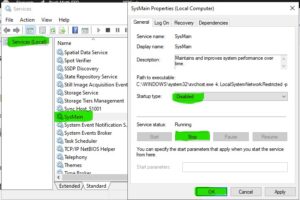
Method 1: Disable the SysMain (Superfetch) Service
Stopping the memory-preloading service often relieves high RAM consumption:
Press
Win + R, typeservices.msc, and press Enter.Scroll down and locate the SysMain service (formerly Superfetch).
Right-click it, select Properties, change the Startup type to Disabled, and click Stop.
Method 2: Update Network and Graphics Drivers
Outdated hardware drivers are the leading cause of non-paged pool memory leaks:
Right-click the Start button and select Device Manager.
Expand categories like Network adapters and Display adapters.
Right-click your network controller or graphics card and select Update driver to install the latest software.
if you’re also experiencing other Windows 10 & 11 Best Ways: Windows 11 Bluetooth Pairing Failed Fix
Method 3: Clear Standby Memory Using RAM Cleaners or Scripts
Clearing cached standby memory forces Windows to release occupied RAM blocks back to active tasks:
Download a trusted lightweight memory management utility or configure a scheduled PowerShell script.
Manually clear the standby list cache whenever RAM usage spikes unexpectedly during long gaming or editing sessions.
Frequently Asked Questions (FAQs)
Q: How do I know if my PC has a memory leak on Windows 11?
A: You can check Task Manager (Ctrl + Shift + Esc). If your total RAM usage remains constantly high (above 80-90%) even when no heavy apps are open, it indicates a memory leak.
Q: Does restarting Windows temporarily fix high RAM usage?
A: Yes, a system reboot flushes the RAM completely, though it only offers a temporary fix until you address the root driver or background service causing the leak.
Conclusion
Keeping your system memory optimized ensures smooth multitasking and responsiveness during heavy computing tasks. By mastering these techniques to fix windows 11 memory leak high ram usage, you can resolve background bottlenecks and keep your computer running at peak speed.
Important Note:
Always keep your Windows OS and hardware drivers fully updated to patch known memory management bugs and prevent system instability.
Final Thoughts on System Performance and Resource Management
To wrap it up, maintaining a fully functional and optimized memory ecosystem is crucial for seamless daily operations and hardware longevity. By proactively managing startup applications and updating system drivers, you protect your workflow against unexpected performance degradation and maintain maximum digital efficiency. Always keep regular backups of your important configuration files before executing deep system modifications or registry edits. Staying proactive with modern diagnostic tools guarantees long-term digital efficiency and peace of mind.